


To answer “What is my eyebrow shape?” trace the outline of one brow from its inner edge toward your temple. A straight brow barely bends, even if a few hairs stick up. Rounded brows form a broad arc, while angled brows have a distinct corner.
Pick one brow and follow the outline from the inner edge to the tail, watching for a smooth curve, a corner, or a second bend near the tip. Try the other side, too, and jot down what you see for each brow if the shapes differ.
Face a window, hold the camera at eye level, and let your forehead relax. Move your bangs or glasses out of the way so you can see both tails. A side-profile photo shows only one brow, so face the camera when you want to compare both. If you tipped your head for the shot, take another straight on. Even a raised eyebrow can change what you see, as Park and colleagues observed in their study of facial expressions.
Wipe away any pencil or powder along the edge and brush the hairs the way they usually lie. Pick one brow to start.
Try the other side, then check your picks against the six shape descriptions. Torn between two? Measure the brow to see where it peaks and look at how it turns there.
A few long hairs can form a spiky skyline over a nearly straight brow. Brush them once in the direction they grow, then trace the thicker band underneath. Does that line have a peak?
Pull up an older photo from before you started shaping, if you have one. Put it beside a straight-on shot of your bare brows today. Did the tail reach farther then? Was the arch in a different spot? Without an older photo, use the outline you can see today. A gap alone won’t tell you where the hairs used to grow.
Two brows can peak at the same height. If yours rises and falls like the rim of a shallow bowl, call it rounded. If you can point to a small, smooth crest, call it curved. If you have to zoom way in to decide, “somewhere between rounded and curved, with a low arch” works just fine.
Try the test on both sides with your head level and your forehead relaxed. Still getting two answers? You can write down “rounded on the left, softly angled on the right.” Our guide to facial asymmetry explains other differences you might notice from one side to the other.
Follow one brow from the bridge of your nose to your temple and look for the bend that best matches one of the six outlines below. Two people can both have straight brows and look quite different if one has a thicker band of hair or a tail that tips down.

“Straight, thick, with a downward tail” describes one brow three ways. The same goes for an arch. It can sit high and turn softly, or sit low and turn a sharp corner.
Imagine a straight line joining the inner end of your brow to the tip. Arch height is the biggest gap between that line and the middle of the hairs, measured at a right angle. Use the same zoom for both brows, or compare that gap as a fraction of each brow’s length.
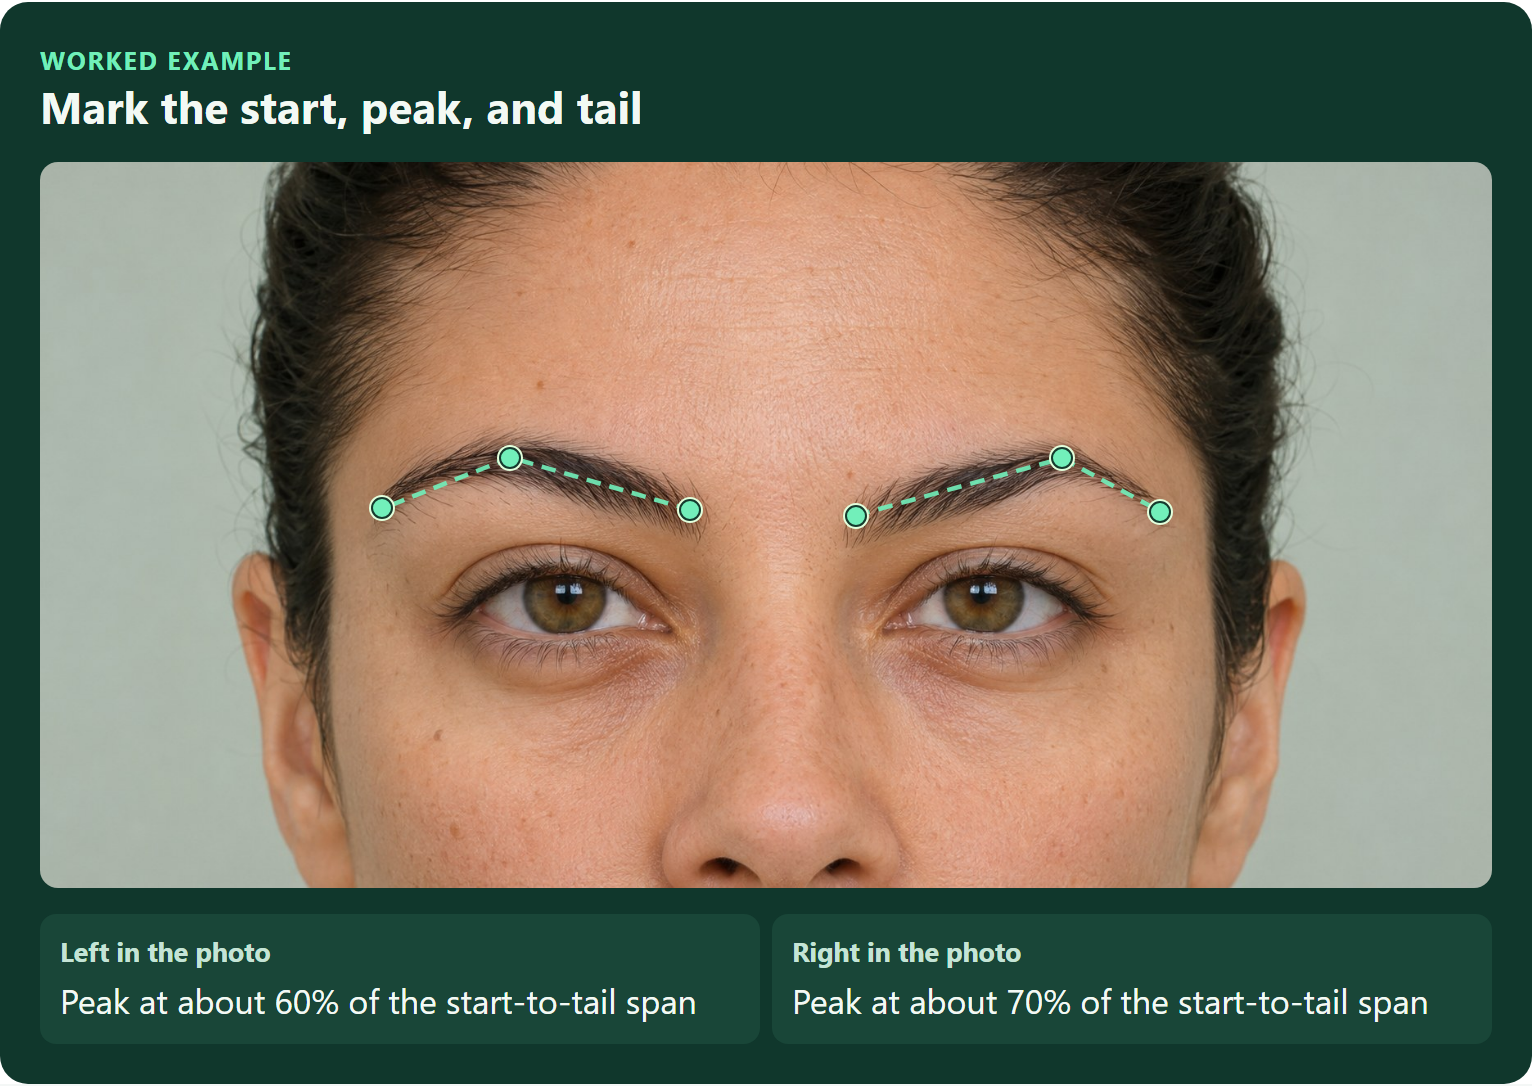
From the peak, draw a line straight down to the baseline at a right angle. Where does it land? Halfway along puts the peak in the center. Closer to the temple puts it farther out. Two arches can be equally high and peak in different places.
Look at the width of the band in the same spot on each brow. You can have thick brows and still see skin between the hairs. Width tells you how broad the band is. Density tells you how tightly the hairs grow together.
Follow the width from the inner end of the brow past the arch. A tapered tail gets narrower as you go. An even-width tail holds its width until just before the tip.
Start at the peak and see how far the hairs reach toward your temple. On two brows with the same start and peak, the shorter tail ends just past the turn. The extended tail keeps going. Check the fine hairs in even light with any pencil wiped away.
Follow the center of the last stretch of hair. Does it climb, run nearly level or descend toward the temple? Look at that segment on its own. The whole brow may rise from the nose while the last part turns down.
Brush long hairs into place and look at the strip of hair beneath the tips. Both brows in the sketches are full. In the first, the strip runs almost level. In the second, it rises into a soft arch. See what one pass with a brush does before you reach for the trimmer.

Get a better jawline in just 28 days

Get rid of a double chin and get an attractive jawline with a daily mewing workout


To measure eyebrow shape, mark where the brow starts, where it peaks, and where the last hairs end, then draw a straight line between the two ends. Use that line as your ruler for both brows to see whether one is longer, arches higher, or peaks closer to your temple.
Put the first dot on the cluster of hairs nearest your nose and the last one where the continuous line fades toward your temple. The peak is the point in the middle of the band that sits farthest above the baseline. If the top stays flat for a stretch, write “no single peak.”
Measure straight across from start to tail. Then measure the two legs of the bend, from start to peak and peak to tail. Together they can be longer than the straight span. For thickness, measure across the band and note where you did it. For arch height, measure from the baseline to the peak at a right angle.
On a straight-on photo, measure the gap between the inner ends of your brows. For the brow-to-eye gap, look straight ahead and use the center of your pupil as a guide. Along that vertical line, measure from the bottom of your brow to the edge of your upper lid. Keep your expression the same next time. The slope of the eye is a separate feature, covered in our guide to eye shape and canthal tilt.
In the sketch, the brow starts at (0, 0), peaks at (30, 6), and ends at (42, 0), with height measured upward in pixels. That makes the straight span 42 px and the arch 6 px high. Follow the bend instead and the two legs measure about 30.6 px and 13.4 px.

The band narrows from 5 px in the body to 2 px near the tip. The gap between brows is 18 px, and the marked brow-to-lid gap is 8 px. Put the taper together with the smooth turn in the sketch and you get “curved, with an outer peak and a tapered tail.” Those numbers describe this drawing.
Mewing includes an eyebrow shape calculator. To check the peak’s position by hand, mark the point on the baseline directly below it. Divide the distance from the start to that mark by the full span and multiply by 100. In the sketch, 30 ÷ 42 × 100 puts the peak about 71% of the way across, in the outer third.
That number tells you where the brow turns. The hairs around the peak tell you whether the turn is smooth or sharp. If there’s no clear peak or the two ends coincide, skip the calculation.
Upload a clear, front-facing photo in the Mewing app to get an AI estimate of your eyebrow shape. For example, if the result is “softly angled,” look at the upper edge of your brow: you should see a distinct but gentle turn toward the tail.
Read the first label from the eyebrow shape analyzer, then see what would tip the choice toward its runner-up. For “rounded” and “curved,” look for a little crest. Check the units beside any measurements. If you see a confidence score, it tells you how sure that model is on its own scale.
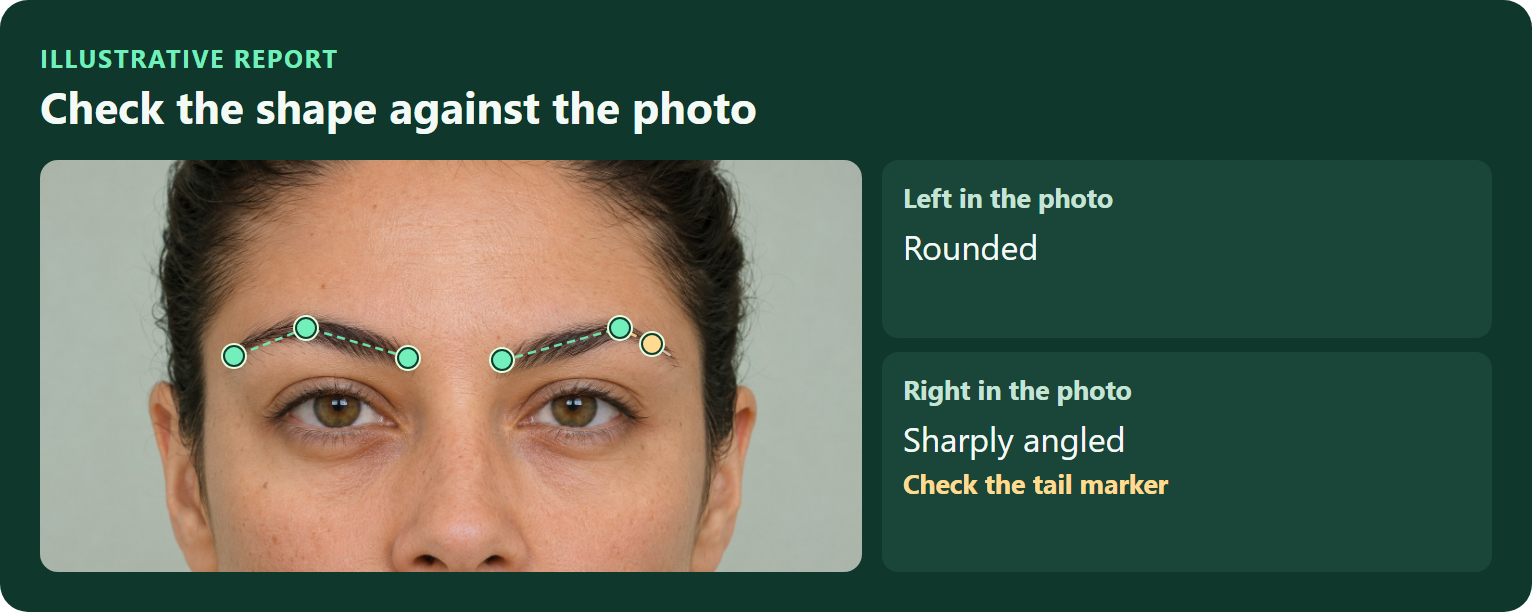
Use an eyebrow shape checker like a second pair of eyes. Hide the outline and find the start, peak, and tail yourself. Now look at the amber dot in the sample. It stops a few hairs early, making the tail look short. Check the corner at the peak separately before you accept “sharply angled.”
By a window, you can see the fine hairs at the end of your brow. Under an overhead light, they can vanish into shadow, so the detector marks the tip too early. Pencil can give the arch a new edge, and turning your head can make one brow look shorter. Change one thing and retake the shot to see what moved the label.
Want to know what you have? A detector labels the brow in your photo. A mapping tool draws guides over it. To see a different look on your face, try a filter. A preference quiz can suggest a style from your answers alone.
Take the free eyebrow shape quiz above using a mirror or a straight-on photo. If you use an online brow scanner, check whether you can see your own result for free. Some sites let you upload a photo for free but ask you to sign up or buy credits to view or save the report.
Before sending a photo, check where the service processes it, who can see it, and how long it keeps both the picture and the result. Look for a way to request deletion. If you can’t find those answers, you can do the mirror test without uploading anything.
Mewing: x10 Your Looks

✓ Get an attractive jawline
✓ Boost your self-confidence
✓ All techniques in a one app

Start with your natural brow shape and try two variations on the same photo in the Mewing app, such as a softer arch or a more defined tail. Compare each one with the original, then choose the look you like and can maintain with your usual routine.
To choose an eyebrow shape you can realistically wear, picture a morning when you have one minute and your usual products. Which eyebrow shape makes sense for you then? If you love a trend on screen, try just the part you like best in daylight before you change the rest.
Make two copies of one straight-on photo. Try a soft arch on the first copy and a sharper angle on the second, keeping the thickness and color the same. View each version beside the original at a size that shows your whole face, so you can see how each arch looks in relation to your cheekbones. If you wanted a little more definition around your eyes, which arch gives you that effect? Check whether you could recreate it with your usual pencil or gel.
On the photo you marked earlier, use a second color to show where you’d like your brow to start, peak, and end. Compare the two outlines to see where you could brush the hairs into place and where you’d need a pencil to extend the tail.
Try these three guide marks in a second color on a copy of your photo. See where each one lands relative to the hairs you already have.
Take the 42-pixel brow from the sketch. Keep the start and peak, then draw the tail 2 px beyond the last hair. See the gap just inside the old edge? Filling that gap puts color between hairs. Extending the tip means drawing on bare skin.
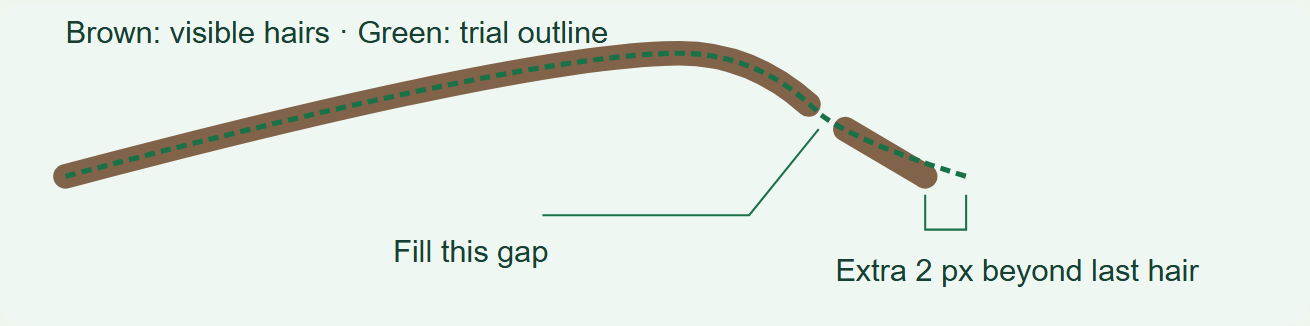
If one tail looks patchy, brush the fine hairs into place and fill only the gaps that still show. Check the tip in daylight before you draw past it. A few pale hairs may already give you the length you want.
A guide can land beyond the tail or above the fullest part of your arch. Hamamoto and colleagues compared three brow design methods and found no consistent preference for one method among their raters. Try the proposed line with a washable pencil beside your natural outline. Keep the version that gives you the effect you wanted.
A virtual brow filter lets you see a softer arch or a fuller tail on your own face while keeping the original photo handy. Change one feature at a time and flip between the two pictures so you can tell exactly which change caught your eye.
Yes. You can try on a different eyebrow shape in the Mewing app and see how it looks on you.
Try a softer arch with the color, width, and texture left alone. On a fresh copy, change the thickness at one spot or shorten the tail. When you try a new shade, keep the outline the same. Can you see individual hairs, or is the color all you notice?
Match the crop and brightness, then put the pictures side by side. Look just at the brows first, then step back and take in your whole face. In this pair, the peak moves toward the temple but stays at the same height. “Peak a little farther out” is enough of a note to recreate it.
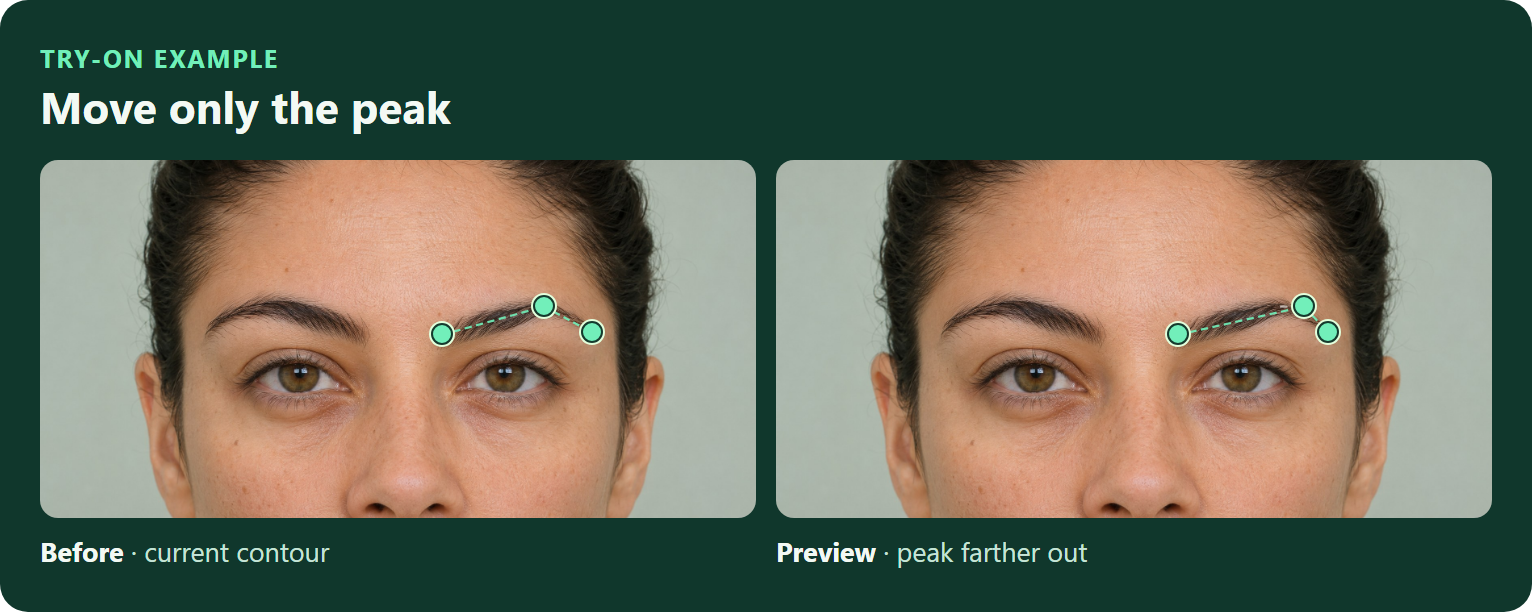
Lay the edited edge over your original. A dab of gel might guide a few hairs into place. A little powder can fill a gap. A tail that lands on bare skin means drawing it on each morning. Choose a brow type that works with your natural growth and routine.
Everything you need for mewing in one app:

1. Learn the correct technique
2. Make it a habit
3.Track your progress
Start with a change you can wash off, then see how much work it takes to get the look you liked on screen. If a few strokes of pencil give you the tail you wanted, you already know what to do tomorrow and can leave the tweezers in the drawer.
Try pencil where an edge is missing, powder where the hair looks sparse, or clear gel where a few hairs stick up. Curious about a thinner brow? Hide a sliver of the edge with concealer, take a look, and wash it off before you decide whether to remove any hair.
For a gap, try a few light pencil strokes between the hairs. If your brows meet over your nose, mark the inner ends you want to keep before deciding whether to tidy the space between them. You can keep the connection, too. If you’re unsure where to stop, leave the hairs alone and show your map to a professional.
Fine hairs at the tip can disappear in one light and show up in another. Check a second photo before shortening the fuller brow to match. If you’re unsure where the edge used to be, start with a soft fill inside the hairs you can see. An older photo can help you decide how far to take it.
Tint changes the color of existing brow hairs, which can make pale hairs easier to see. Lamination chemically changes how the hairs can be set, so a brushed-up outline may look fuller. Microblading places pigment in the skin to simulate strokes where a preview shows more hair. The FDA classifies permanent eyebrow makeup as cosmetic tattooing.
For a lasting change, bring the original and preview to a consultation. A board-certified dermatologist can discuss skin suitability and risks before a cosmetic procedure.
Bring three things to the appointment. Your bare-brow photo shows the starting point, the map shows where you want the change, and the preview shows the look. Be specific: “Keep my peak where it is and fill this gap in the tail.” Ask what you could do with styling alone and what would take hair removal or pigment.
Once you get the look you want with your usual products, snap a photo. Next time, try the same step in the same light and from the same angle. If the tail looks longer, check whether your pencil went past the last hair. If the arch looks higher, brush the hairs back into place before deciding you need another tidy-up.
There’s no single most attractive shape for everyone. Put two versions of your own photo side by side. You might like what a stronger arch does around your eyes and still prefer the softer line when you look at your whole face. That’s a good reason to keep it.
There’s no clear answer. It depends on whose brows were counted and how the shapes were defined. Group rounded and curved brows together and you get a different count than if you treat them as two types. A reliable ranking would need consistent labels and a representative sample.
No. A filter can show where you’d like the tail to end, but it can’t show how pigment will heal or age on your skin. Bring the preview to your consultation and ask what that outline might look like once it heals.
